You are probably very curious to read about how to use this really cool tool that got my latest blog post shared and promoted quickly and easily over a short period of time on Twitter.
And I am guessing it is because you want people to share YOUR high quality, killer (probably voice over) blog content often and quickly. You’ve put a lot of work into your content. Why wouldn’t you want that?
If I’ve guessed right, you’ve come to the right place.
But before I get to the meat of “how to use” this free tool, you must understand something very, very important about Twitter that many people forget.
The average tweet for the average Joe and Jane lasts for 5 minutes. <- That includes the average John who tweets about marketing and voice over related content (sorry about the 3rd person).
In order for anyone to get your message, read your content, visit your website, or find your services, you have to tweet on a regular basis; otherwise, your sparse amount of tweets will just disappear into the Twitter vortex in the blink of an eye. But churning out tweets consistently and over time can turn into an absolute time suck. I used to spend hours piling up new tweets to send out…
This is why you need the help of other people to share your high quality words, content, and services for you so you don’t always have to. And the tool I’m going to show you can help you accomplish that.
This has a doubly powerful effect, because when people see your content shared by someone else, it’s social proof that maybe your content should be clicked on and read.
As you read this right now and more articles in the future, you could have people tweeting out your content for you like people are with my post from last week called “28 Veteran Voice Actors Give Brutally Honest Advice To Their Noobie VO Selves.”
To give you some time to read through this tutorial, I have a specifically designed, pre-written tweet for you that gives value to your followers. I’ve already written the tweet for you. All you have to do is click on the link below to tweet it. The tweet shows your website visitors and readers who use Twitter how excited you are to improve their experience on your site:
That link above is actually the tool I’m going to walk you through in action. If you haven’t clicked it already, give it a try. You don’t have to tweet it out, but I’d like you to see it in action because that is the example I’m going to use as I am going through this step-by-step guide.
4 important notes you need to know before you can implement this tool into your own blog.
1. If you want people to use this tool on Twitter, you need a Twitter profile. Sign up with one here: https://twitter.com/.
2. I said HIGH QUALITY content up at the beginning of this post. I am sure your content is rock solid, but if your content is garbage and your reader does not find value in it, he or she will not share it. Plus, the best Twitter tool in the world won’t turn a heaping, stinking pile of garbage content into gold content. I wish it could, because it would be a whole lot easier to do this blogging thing…
3. If you do it right, this tool creates what people call a nearly “frictionless” experience for readers. That means that it makes it very easy for your readers to do what you’re hoping they will do. In this case, it means they will share your content via Twitter. They won’t have a million hoops to jump through to use this tool. If you do it wrong, no one will use it because you’ve made it more complicated than it has to be.
4. You need access to your website’s code or html text. If you use WordPress, I will show you how to do this below. If you do not use a WordPress site or blog, you should still read through this because it may be very easy to implement it on your site, too. If you are having trouble after you read through this tutorial, please email me at John@VoiceOverGenie.com and I can help you get it running.
Your New Tool: ClickToTweet
The Twitter tool I am talking about is called ClickToTweet. I first heard about it on an incredibly informative free social media marketing website/blog called Social Media Examiner.
What ClickToTweet Does:
ClickToTweet allows you to pre-construct tweets for your website visitors to click on and easily tweet out to their followers with no typing necessary (but they can if they want). Normally, Twitter users have to construct their own tweet about your content which I know holds many people back from tweeting out your content. With ClickToTweet, you create a simple link that fosters incredibly easy sharing without any typing necessary for the tweeter.
ClickToTweet also allows you to track when people are tweeting out your pre-constructed tweet which is highly useful when you are testing out new methods to use this tool.
An Example of What 1 Looks Like in Action:
To illustrate this step-by-step guide, I am using the example I used above. Here it is again:
If you haven’t already, click on that line to see what pops up. You don’t have to tweet it, but I would like for you to see it in action for yourself.
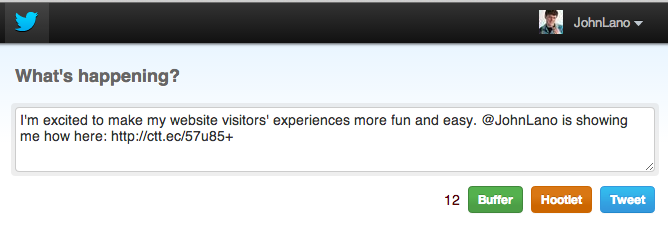
Here’s what it looks like after you click on it:
As you can see, it generates a pre-written tweet that I already constructed. All the reader (you) has to do is click “Tweet” to share my content.
Step-by-Step Guide to Using ClickToTweet for your website and blog:
Step 1: Create a Twitter Account
If you already have a Twitter account, you are all set. If you do not have one, simply to go https://twitter.com/. It is very easy to setup.
Step 2: Create a ClickToTweet Account
To create an account, go to http://clicktotweet.com/.
Click on “Sign in with Twitter to get started.”
Next, you’ll have to “Authorize app.” This basically means you are allowing ClickToTweet to access your Twitter account.
Step 3: Write Your Pre-Written Tweet
In the blank box, you will write whatever you want your pre-written tweet to say.
This is what I wrote:
5 pre-written tweet tips:
1. Write something that you think someone would actually write for him or herself. I would never tweet something like “Buy this now!” or a tweet that only has a link.
2. Use personal pronouns for the tweeter like “I” or “my” or even “you.” Your readers are individuals, and they want to feel that way when they are tweeting. I know I do.
3. Put your URL and Twitter handle in the tweet in a way that adds value. This isn’t always appropriate to do, especially because it takes up the limited space available for a tweet (140 characters), but in order for you or your content to gain traction in the Twitterverse, you have to at least point people back at yourself. But it can’t be a completely self-serving thing. In the Tweet I constructed above, I wanted my readers (you) to show their readers (yours) that they are continually working to improve their website visitors’ experiences. That adds value to the tweeter’s audience.
4. If you use your content’s URL or web address, shorten your URL to give more room for your tweet’s text by using a URL shortener like Google URL Shortener. Copy and paste your shortened URL into your text box. ClickToTweet DOES shorten your URL, but if you shorten it first, it gives you more room to construct your tweet in the first place.
5. Write quotes and link back to your site. People love quotes.
Step 4: Check Off the Tracking Boxes*
Be sure to check off the two linking tracking boxes below your pre-written tweet like this:
By clicking these boxes, you can track when and how often your ClickToTweet button is pushed on your website and when and how often any links inside your pre-written tweet are clicked.
*The free account version of this tool only allows you to track 5 ClickToTweet tweets. However, you can generate as many pre-written tweets as you want. I’ll show you that soon.
Step 5: Click Generate New Link
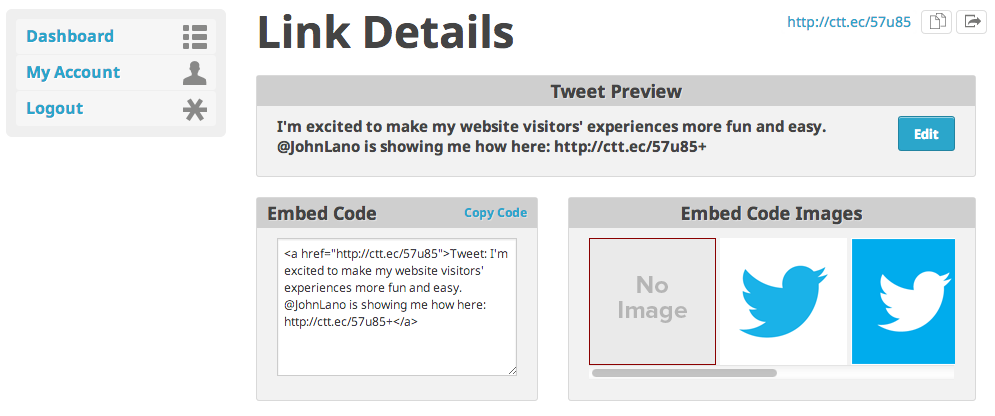
After you click “Generate New Link,” this screen will appear:
On this screen, you can edit your tweet at any time if you’d like by clicking “Edit.”
Step 6: Customize your Embed Code Image (if you’d like)
You can customize what image appears on your website or blog post for people to click. It can either be just text or one of those bird logos. Personally, I prefer to have it be text only so people can see what they are tweeting and I can use call to action wording that is more likely to get them to click.
This is what it looks like on your page if you choose one of those Twitter birds:
Step 7: Customize the Text that will Appear on Your Web Page (if you’d like)
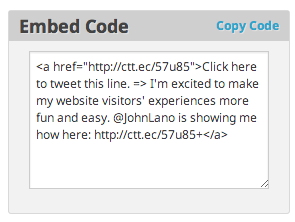
If you choose to use text only and no bird button, you can customize what your readers will see on your webpage or blog post. By default, the text will read “Tweet:” followed by whatever your tweet says. However, you can make this a much more powerful link by making it even more customized for your visitors.
Instead of this:
Mine says this:
This second link is much easier for your reader to follow. It’s also a much more clear call to action.
To customize the text before your tweet, simply change the text in the code (between the > and < symbols). This will NOT change what your tweet says, only what it says on your webpage or blog post.
Do NOT change the “<a href=….>” before the text. If you do, the link will no longer be clickable for your readers.
Step 8: Copy and Paste the Embed Code and Put it on Your WordPress Page
Copy your embed code.
In WordPress, go to your Dashboard and click on the post or page you’d like to put the link in.
I am using a blog post as an example here in WordPress. So click on one of your posts. Click “Text” in the upper right corner (not “Visual”) like below, and paste your code where you’d like it to appear on your page.
As you can see, I clearly put the embed code in between two paragraphs. This makes the clickable link very easy to see for readers. (CLICK on the image below to see it enlarged.)
Step 9: Test Your ClickToTweet Button/Link
View your published page after you have embedded the code, and click on the link.
It should create your pre-written tweet like this:
Step 10: Track Your ClickToTweet Statistics
Go to your ClickToTweet dashboard.
Click on your tweet you just added.
Below the tweet code, you will see this:
This allows you to see how many times your link is clicked on your webpage or blog post (Total Clicks) and by how many different people (Unique Clicks).
Click on “Embedded Link Tracking” and you’ll see this:
This shows you how many times the link is clicked within each reader’s tweet (Total Clicks) and by how many different people (Unique Clicks).
Step 11 (Optional): If You Write Out 5 Tracked Tweets on ClickToTweet’s Free Version, You Can Still Create ClickToTweet Tweets But They are Untracked and Not Customizable After Created
After you have filled out 5 tracked tweets, you’ll see this where you can write your new tweet on the dashboard:
Write your tweet following Step 3 above.
Click “Generate Basic Link.”
You’ll see this:
Copy that blue link in the center.
Paste it onto your webpage or blog post like any normal link. (There will be no code here because it is not trackable.)
You can then write what the tweet is in front of the link like this example:
Click this link (http://fdfdf) to tweet this message to your followers: This is a test tweet.
Step 12: Enjoy the Benefits
Your readers who also tweet will love the simplicity of your new tool. They can quickly and easily share awesome content with their followers without having to construct their own ideas and thoughts if they don’t want to. When you make it that easy, it’s so much more inviting to click.
If you have any questions, please ask them in comments below. If I don’t know the answer, I will find it for you.
Good luck and have fun!
p.s. Did you enjoy this step-by-step guide? If so, scroll to the upper right side of this page and subscribe to my blog. Simply fill in your name and email address, and I’ll send you more free content like this.


6 Comments on “How to Use the 1 Tool that Generated Over 15 Tweets of My Voice Over Blog Post in 3 Days”
Hey that’s fab! Thanks for the instructions. Just popped one on a blog of mine, will do so for future blog posts too. See if it ads to site traffic at all.
Nic
http://www.nicolaredman.com
Awesome, Nic! I would love to see it. Can you share your blog post link, please? 🙂
Here you go, what do you think?
http://nicolaredman.com/northern-irish-voiceover-blog-nicolaredman/2014/2/28/advice-ahoy
Pingback: How to Use the 1 Tool that Generated Over 15 Tw...
I’m so glad you introduced me to this feature. I implemented it last week on a couple blogs and it generated new traffic for me almost immediately! It’ll definitely be a permanent fixture on my site moving forward.
Marc, you’re very welcome.
And that’s awesome! I’d love to see where you implemented it. Link, please. 🙂